
🌸 The Delilah Granny Square Top
- Tiffany

- Aug 3, 2025
- 5 min read
Updated: Aug 8, 2025
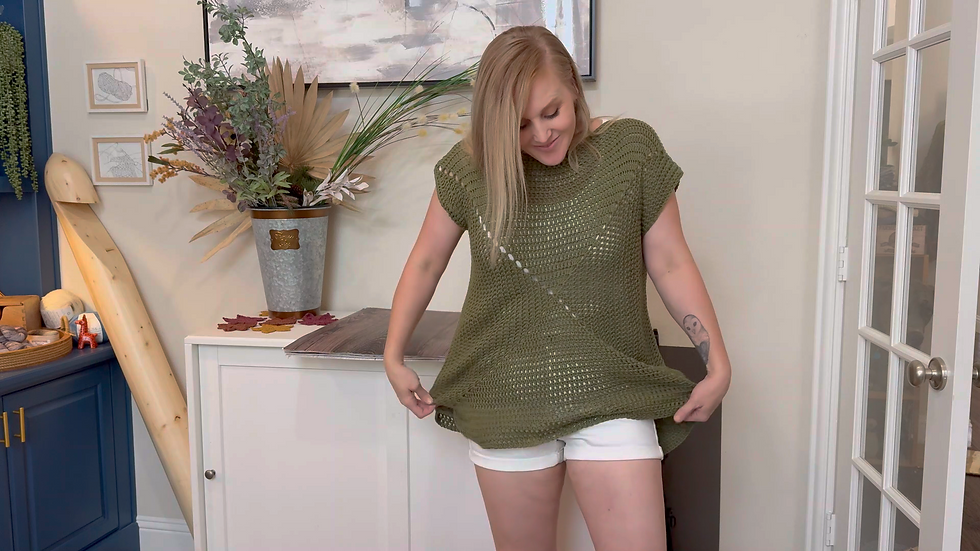
The Delilah Top is finally here—and it’s everything I hoped it would be! This breezy, beginner-friendly crochet top is made entirely from granny squares, making it a perfect first wearable project or a fun, meditative make for seasoned crocheters. Whether you're looking for a light summer piece or want to show off your favorite yarn colors, the Delilah Top has you covered.
In this post, you’ll find:
📺 Links to the full video tutorial series
📏 The full sizing chart from XS to 5XL
📄 A link to purchase the printable pattern PDF for easy reference
🧶 Watch the Video Tutorial Series
Different Ways To Wear It!


Dress it up OR go casual. Make it your own!
📏 Sizing Chart (XS–5XL)

MATTERIALS -
🧵 Materials I’m Using
➤ Yarn: Coboo by Lion Brand – https://amzn.to/44kDDeP
➤ Crochet Hook H/8-5.00mm – http://bit.ly/40t5Vm9
➤ Scissors – https://amzn.to/45FgBlf
➤ Yarn Needle – https://amzn.to/40sPQNp
➤ Measuring Tape – https://amzn.to/3HVTol4
➤ Stitch Markers - https://amzn.to/49YFI2l
Sizes Indicated In Pattern
XS, S(M, L, XL, 2XL, 3XL, 4XL, 5XL)

⚠️ Affiliate Link Disclosure Some links above are affiliate links, which means I may receive a small commission if you purchase through them—at no additional cost to you. These links help support my channel and allow me to continue creating free crochet content. Thank you so much for your support!
PATTERN -
US Terminology
Level - Beginner Friendly
Make 2 Square Panels The We Will Join Together
Begin with a magic ring
Rnd 1:
(If working the MR, ch 3, this counts as your first dc st),
Make 3 dc in the ring or first ch
ch 2, 4 dc in ring or ch
ch 2, 4 dc in ring or ch
ch 2, 4 dc in ring or ch
(Total 4 sides)
To close rnd, ch 1, hdc in the top ch of
beginner ch-3.
Rnd 2:
Slst around the post of the hdc you just made to close rnd 1,
ch 3 (counts as your first dc st),
dc around the same post of the hdc st,
(these will be the first 2 stitches of this corner)
Make 1 dc in each st from rnd below,
in the ch-2 corner [2 dc, ch 2, 2 dc]
Repeat *1 dc in each st, [2 dc, ch 2, 2 dc]
in each ch-2 corner* around.
To close rnd 2:
make 2 dc in the ch-2 corner, ch 1, hdc in the top ch of beginning ch-3.
Repeat Rnd 2 for Rnd 3 - ____
19, 20(21, 23, 24, 25, 26, 27, 28)


Joining Panels
Adding Stitch Markers
Stack panels so that the front panel is laying on top of the back panel.
Make sure the sides align.
Taking your stitch markers, first pin the 4 corners together.
Next tackle the top of the shirt where your collar will be. Measure from the corner inward 5in, 6in(6 3/4in, 7 3/4in,
8 1/4in, 9 1/4in, 10 1/4in, 11in, 12in)
Mark with a stitch marker. Repeat on other side.
After the shoulders have been identified let’s move on to the sides of the shirt.
It is shorter to measure the length of the arm hole from the top corner down.
Measure in inches:
6, 6(7, 7, 8, 9, 10, 10, 11) and mark with a stitch marker.
We will be keeping this section open and joining the larger section closed.

Now that all measurements are marked we can join the two panels together.
Joining with the Mattress Stitch Join
Taking your Yarn, Yarn Needle, and Scissors, cut a long strand of yarn and feed it through the yarn needle.
Enter yarn needle through the bottom corner of both panels. Tie a knot to secure the yarn to the project.
Insert yarn needle from the back to front of the BLO of the first stitch, then, looking at panel #2, insert your yarn needle from the back to front of the BLO of the aligned stitch on THAT panel.
Mattress Join Made!
Insert yarn needle into the next free stitch of panel #1 from back to front of the BLO. Then finding the next free stitch on panel #2, insert yarn needle from back to front of the BLO. And pull.
Make sure to pull yarn gently to avoid puckering.
Repeat until you reach the stitch marker.
Tie off your join and repeat everything you just did to attach each joining section.


Make sure to keep the arm holes and neckline hole open.
Weave in all your ends before you move on.
Sleeves:
Taking your yarn and crochet hook,
slst into the bottom join where the armpit would be.
Ch 1, make your first sc into the same join sp you just slst’d into, then work one sc in each stitch to top corner join where your shoulder would be,
sc into the join itself then continue making one sc in each st along the next panel.
Close rnd with a slst in the top of the first sc made.
I just capped off my sleeve.
For full sleeves:
After your last sc round, ch 2 (does not count as a stitch).
Dc in each stitch around.
Close each round with a sl st to the top of the first dc.
Repeat until sleeve reaches your desired length.
Repeat for second sleeve.

Collar:
Slst in the join next to the shoulder.
Ch 1, slst loosely in each st along the panel, slst into the join between the two panels, slst into each st on the next panel. Slst into the first slst of collar to close. Tie off.
Bottom Border:
I personally did not add a bottom border but if you would like to, this is what you would do.
Start by turning the top so the shoulders are down and the bottom of the shirt is up.
Begin by slst’ing into the first st of the front panel.
Ch 1.
We will want to work on the edge or very bottom NOT on the front of the work. To achieve this I work into the foundation row sts.
Sl st loosely into each foundation row stitch or loop to avoid tightness. Close Border with a slst in the first st.

Tie Off.
Weave in all your ends.
PROJECT COMPLETE!!
🧾 Get the Printable Pattern PDF
Prefer to work off a clean printable version? The full written pattern (with photos + tips) is available now:
📣 Share Your Project!
If you make the Delilah Top, I’d love to see it! Tag me on Instagram @CrochetwithTiffany or post inside the Crochet Club Community.
🌟 Join the Crochet Club
Want more support, tips, exclusive worksheets, and a fun community to share your projects with?
Come join us in The Crochet Club!
You’ll love it here.
Check it out ▶ https://www.crochetwithtiffany.com/crochetclubmembershiphome
Seeing your makes truly makes my day 💖


Comments