
🧶 Warm Up America Veterans Blanket Campaign
- Tiffany

- Apr 15
- 14 min read
Updated: May 2
(FREE Pattern + How to Donate)
Project Written and Designed by Crochet With Tiffany

DISCLAIMER: *This post may contain affiliate links to support the cost of this blog. At no cost to you, I may make a small commission if you purchase through these links. Read our Privacy Policy HERE
A Project With Purpose
There are some crochet projects that are beautiful…and then there are some that truly mean something. This is one of those projects.
From April 15th through the end of May, we are coming together as a community to create handmade crochet blankets for veterans through Warm Up America!.
These blankets will be distributed to veterans across the country—bringing warmth, comfort, and a reminder that someone cares.
💙 And I would love for you to be a part of it.
🧡 About Warm Up America

Warm Up America! is a nonprofit that connects makers with people in need through handmade items like blankets, hats, and accessories.
Their mission is simple and powerful:
Provide warmth and comfort to those in need… one stitch at a time.
Through this campaign, we’re focusing specifically on supporting veterans, honoring their service with something handmade and heartfelt.
📅 Campaign Details
Start Date: April 15
End Date: May 31
Donation Count Results: Mid-June (I’ll share total impact with you!)
📦 Shipping Address:
Warm Up America!
ATTN: "Tiffany Veterans"
3740 N. Josey Lane,
Suite 126
Carrollton, TX 75007
⚠️ Important: Please label your package with: “Tiffany’s Veterans ” so your donation is included in our community total!
🧶 Materials Used
For my sample blanket, I used:
Yarn: Michaels Loop & Threads Impeccable Yarn (Size 4 weight)
Colors:


4 skeins Blue | 3 skeins White | 3 skeins Red
✔️ Soft
✔️ Durable
✔️ Washable (important for donations!)
📏 Blanket Dimensions
Width: 41 inches
Length: 50 inches
These dimensions align with donation guidelines and create a perfect lap blanket size for comfort and usability.
🎥 Video Tutorial
🎬 Full Project Tutorial! 👇

🧩 Blanket Construction Overview
This blanket is made up of 5 unique panels, each bringing its own texture and meaning.
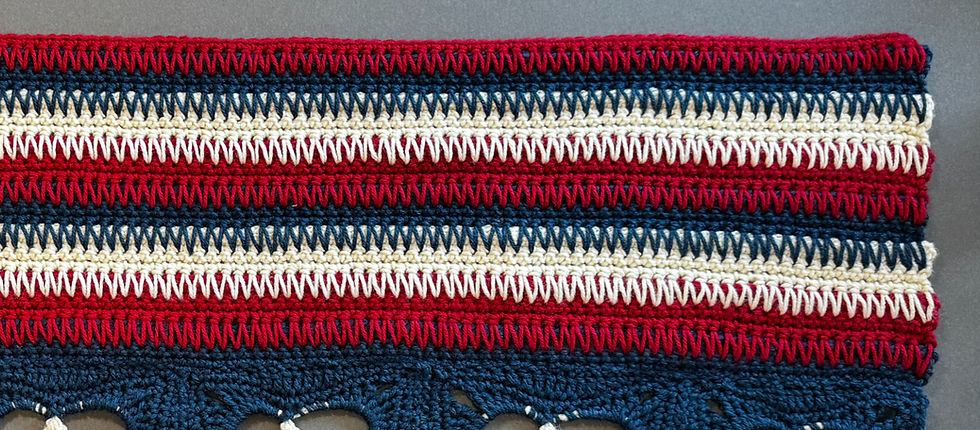
⭐ Panel 1: Suzette Stitch Stripes
A bold red, white, and blue stripe pattern that sets the tone.
Beginner-friendly
Great rhythm stitching
Represents unity and strength
⭐ Panel 2: The Lemon Peel (Up/Down) Stitch
This section adds dimension and visual interest.
Builds confidence with stitch variation
Adds a cozy, structured feel
⭐ Panel 3: The Cane Webbing Stitch Pattern
A mix of stitches that creates a woven-like look.
Visually striking
Keeps the project engaging
⭐ Panel 4: The Star Squares
The heart of the blanket.
Features star elements
Symbolizes honor and service
⭐ Panel 5: The Serged Strips
This deep spike stitch creates a thick fabric and neet design.
Overlaping colors draw your eye
Suprisingly simple
⭐ Joining & Border
Brings everything together.
Clean finish
Balanced color placement
Framed look

Please print, fill out and include the DONATION FORM with your donation
when you ship it in.
This will help Warm Up America to keep track of the donation count
AND this campaign all together.
Thank you!
🧵 Pattern (US Terminology)
Skill Level:
Beginner to Advanced Beginner
Abbreviations:
ch – chain
sc – single crochet
hdc - half double crochet
dc – double crochet
tr - treble crochet
dtr - double treble crochet
st(s) – stitch(es)
slst – slip stitch
dc3tog - double crochet 3 stitches together
BPsc - Back Post single crochet
BLO - Back Loop Only
FPdtr - Front Post double treble crochet stitch
Rnd - Round (instead of Row but in a circle)
*. - Repeat instructions following astrisks
Copyright & Usage Disclaimer
© 2026 Crochet with Tiffany. All rights reserved.
This crochet pattern has been provided free of charge in support of the Warm Up America Veteran Blanket Campaign. While I am honored to share this design for a meaningful cause, this pattern remains the intellectual property of Crochet with Tiffany.
✔️ You MAY:
Use this pattern to create blankets for donation, including the Warm Up America campaign
Make finished items for personal use or gifting
Share photos of your finished projects
(credit to Crochet with Tiffany is always appreciated!)
Link directly to this blog post or video tutorial when sharing
❌ You MAY NOT:
Copy, reproduce, distribute, or sell this pattern in whole or in part
Upload, share, or distribute the PDF version of this pattern
Rewrite, translate, or modify this pattern for resale or redistribution
Use this pattern for commercial pattern sales or mass production
Claim this design as your own
💙 Charity Intent
This pattern is being offered freely to encourage participation in a charitable effort. Please respect the spirit of this project by using it in a way that supports the community and honors its purpose.
⚠️ Disclaimer
This pattern is provided for personal and charitable use. Results may vary depending on yarn, tension, and skill level. Crochet with Tiffany is not responsible for individual project outcomes.
Unauthorized distribution or resale of this pattern, including digital or printed formats, is strictly prohibited.
INSTRUCTIONS

Panel 1 – Suzette Stitch Stripes
Multiple Stitch Count = Multiple 2 + 1
Using Colors Red + White
(Measures 37 inches wide x 10 inches long)
Starting with Red color
Ch 107
Row 1:
[Make one sc AND one dc] in the second ch from your crochet hook,
skip next ch,
*[sc & dc] in the next st, skip the next st.
Repeat across row ending with one sc in the last st.
(Total 53 groups OR 107 sts)
Row 2:
ch 1, turn, [sc & dc] in the first sc,
skip the dc,
*[sc & dc] in the next sc, skip dc.
Repeat across row ending with one sc in the last sc st.
(Total 53 groups OR 107 sts)
Rows 3 - 6: Repeat Row 2
Tie off your work. Switch to white color. Turn project, slst into the first st to attach the yarn to the project. Ch 1. (Total 53 groups OR 107 sts)
Rows 7 - 12: Repeat Row 2
Tie off your work. Switch to red color. Turn project, slst into the first st to attach the yarn to the project.
Ch 1. (Total 53 groups OR 107 sts)
Rows 13 - 18: Repeat Row 2
Tie off your work. Switch to white color. Turn project, slst into the first st to attach the yarn to the project. Ch 1. (Total 53 groups OR 107 sts)
Rows 19 - 24: Repeat Row 2
Tie off your work. Switch to red color. Turn project, slst into the first st to attach the yarn to the project.
Ch 1. (Total 53 groups OR 107 sts)
Rows 24 - 30: Repeat Row 2
Tie off your work. Weave in your ends. Panel 1 is complete. (Total 53 groups OR 107 sts)

Panel 2 – Lemon Peel Stitch
Multiple Stitch Count = Any Even Number
Using Only The Blue Color
(Measures 10 inches wide x 37 inches long)
Ch 30
Row 1:
sc in the second ch from your crochet hook,
dc in the next ch,
*sc in the next ch, dc in the next ch.
Repeat across the row. Ending row with a sc in the last st.
(Total 29 sts)
Row 2:
ch 2 (counts as first dc)
turn your work,
*sc on top of each dc st, dc on top of each sc st.
Repeat across row. Ending row with a dc in the last st.
(Total 29 sts)
Row 3:
ch 1, turn your work,
*sc on top of each dc st, dc on top of each sc st.
Repeat across row. Ending row with a sc in the last st.
(Total 29 sts)
Rows 4 - 100 : Repeat Rows 2 & 3
You want to make however many rows you need to match the width of Panel 1.
There are no requirements on how many rows to make so don't worry if you make more or less than I made.
Tie off your work. Weave in your ends. Panel 2 is complete.

Panel 3 – Cane Webbing Pattern
Multiple Stitch Count = Multiple 5 + 1
Using all 3 colors (Red, White & Blue)
(Measures 9 inches wide x 37 inches long)
Starting with the Red Color
Ch 31
Row 1:
sc in the second ch from your crochet hook and in each ch across the row.
(Total 30 sts)
Row 2:
ch 1, turn, slst in each st across the row.
(Total 30 sts)
Tie off your work, turn your project, taking white color, slst into the first st to attach the yarn to the project.
Row 3:
ch 1, hdc in the BLO of each slst across the row.
(Total 30 sts)
Row 4:
ch 2, turn, hdc in each st across the row.
(Total 30 sts)
Tie off your work, turn your project, taking blue color, slst into the first st to attach the yarn to the project.
Row 5:
ch 1, turn, sc in the first 3 sts,
FPdtr around the 6th sc st from Row 1
skip the 4th st of Row 5, sc in the next st,
FPdtr around the 4th sc st from Row 1 crossing over the first FPdtr,
skip the 6th st of Row 5, sc in the next 2 sts.
Repeat *FPdtr around the 5th sc of Row 1 from the previous FPdtr st,
skip the next st of Row 5, sc in the next st,
FPdtr around the previous FPdtr and 2 sts behind the sc of Row 1 of the first FPdtr,
skip the next st of Row 5, sc in the next 2 sts.
Ending row with one sc in the last 4 sts.
(Total 30 sts)
Row 6:
ch 1, turn, slst in each st across the row.
(Total 30 sts)
Tie off your work, turn your project, taking white color, slst into the first st to attach the yarn to the project.
Row 7:
ch 1, hdc in the BLO of each slst across the row.
(Total 30 sts)
Row 8:
ch 2, turn, hdc in each st across the row.
(Total 30 sts)
Tie off your work, turn your project, taking red color, slst into the first st to attach the yarn to the project.
Row 9:
ch 1, sc in the first st,
FPdtr around the 4th sc st from Row 5
skip the 2nd st of Row 9, sc in the next st,
FPdtr around the 2nd sc st from Row 5 crossing over the first FPdtr,
skip the 4th st of Row 9, sc in the next 2 sts.
Repeat *FPdtr around the 5th sc of Row 5 from the previous FPdtr st,
skip the next st of Row 9, sc in the next st,
FPdtr around the previous FPdtr and 2 sts behind the sc of Row 5 of the first FPdtr,
skip the next st of Row 9, sc in the next 2 sts.
Ending row with one sc st
(Total 30 sts)
Row 10:
ch 1, turn, slst in each st across the row.
(Total 30 sts)
Tie off your work, turn your project, taking white color, slst into the first st to attach the yarn to the project.
Row 11:
ch 1, hdc in the BLO of each slst across the row.
(Total 30 sts)
Row 12:
ch 2, turn, hdc in each st across the row.
(Total 30 sts)
Rows 13 -126: Repeat Rows 5 - 12
Tie off your work. Weave in your ends. Panel 3 is complete.

Panel 4 – Star Squares (Make 6)
(Measuring 6 inches wide x 6 inches long)
Using only the Blue and White colors
Starting with the White Color
Magic Ring
Rnd 1: ch 2 (counts as first dc)
Make 14 dc in magic ring.
Slst into the top of the ch 2 to close rnd.
(Total 15 sts)
Rnd 2: ch 2 (does NOT counts as a st)
dc3tog, ch 10,
dc3tog, ch 10,
dc3tog, ch 2,
dc3tog, ch 10,
dc3tog, ch 10
slst in top of first dc3tog to close rnd.
Tie off white color, slst blue in the ch-10 section left to the top point of the star.
Rnd 3: ch 1, working all sts around the ch-10,
3 sc, 2 hdc, dc, tr, ch 3, tr, dc, 2 hdc, 3 sc.
This will bring you to one point of the star.
BPsc around the top point of the star.
(This will help make that point more pointy)
This next section should be next to the bottom of the star with the ch 2 between
points.

Working all sts around the ch-10,
3 sc, 2 hdc, dc, tr, ch 3, tr, dc,
THEN 2 hdc, 1 sc, BPsc around one point of star, 3 sc around the middle ch-2,
BPsc around the next point of star, (now in next ch-10 space)
1 sc, 2 hdc, dc, tr, ch 3, tr, dc, 2 hdc, 3 sc.
BPsc around the next point of star.
Next section is a ch-10 section.
3 sc, 2 hdc, dc, tr, ch 3, tr, dc, 2 hdc, 3 sc.
BPsc around the last point of star.
Slst into the top of the first sc to close rnd.
Rnd 4: Ch 1, sc in each st and in each ch-3 corner (sc, ch 2, sc)
Slst into the top of the first sc to close rnd.
Rnd 5: Ch 3 (counts as first dc)
dc in the next 2 sts,
hdc in the next 2 sts,
sc in the next 3 sts,
Corner = (sc, ch 2, sc)
EACH SIDE: sc in the first 3 sts,
hdc in the next 2 sts,
dc in the next 7 sts,
hdc in the next 2 sts,
sc in the last 3 sts,
Corner: (sc, ch 2, sc)
Last side: sc in the first 3 sts,
hdc in the next 2 sts,
dc in the last 4 sts,
slst into the top ch of beginning ch-3 to close rnd.
Tie off your work. Weave in your ends. One Star Down, 5 more to go. Total 6 star squares.
Make sure to block your star squares so they can stretch to our desired size. Will also help define the star more.

Panel 5 – Serged Strips
Multiple Stitch Count = Any number + 1 for turning chain
Using all 3 colors (Red, White and Blue)
(Measures 37 inches wide x 8.5 inches long)
Starting with the Blue Color.
Ch 108
Row 1: sc in the 2nd ch and in each ch across.
(Total 107 sts)
Rows 2 - 5: ch 1, turn, sc in each st across.
(Total 107 sts)
Tie off Blue color. Switch to Red color. Slst in the first st to attach the yarn to the project.
Row 6: ch 1, insert crochet hook into the first st 3 rows below. Loosely pull up a loop to match
the current row. Yarn over and pull through the 2 loops on your crochet hook to finish
the sc st.
Repeat for every st across row.
Be Very Careful To Have A Loose Stitch Here!!! You want your stitches to lay over
the previous 3 rows NOT bunch them.
You may notice we are not inserting any stitches into Row 5 and so Row 6 looks like it
is hovering on top of Row 5. This is OK. The following rows will help anchor these
stitches to the project.
Rows 7 - 11: ch 1, turn, sc in each st across.
(Total 107 sts)
Tie off Red color. Switch to White color. Slst in the first st to attach the yarn to the project.
Row 12: ch 1, insert crochet hook into the first st 3 rows below. Loosely pull up a loop to
match the current row. Yarn over and pull through the 2 loops on your crochet hook
to finish the sc st.
Repeat for every st across row.
Rows 13 - 17: ch 1, turn, sc in each st across.
(Total 107 sts)
Rows 18 - 36: Repeat this pattern of switching color to make the Spike stitch row. Then
continuing that same color for the next 4 rows of sc sts.
Repeating Blue, then Red, then White.

JOINING -
Use one of the colors you are joining together for an invisible join.
I chose the Mattress Stitch Join under Both Loops to join all of the pieces of this project together.
I personally wanted my panels to lay flat and look as though they seamlessly came together. It also worked out better when joining the sides of work together.
I did not make a border around each individual panel but you can add the border if it helps you to join the pieces together.

BORDER -
Using all 3 colors (Red, White and Blue)
Starting with the Blue color
Rnd 1 of the border is the MOST important round because you are setting up the foundation making sure the border will lay flat. Skipping sts or adding sts where needed to make this happen. Follow the needs of your own blanket as everyone has a different st tension.
Rnd 1: slst into the top corner stitch of the blanket to attach the yarn to the project.
Ch 1, hdc in each st across.
Corner/last st: (hdc, ch 2, hdc) then rotate your blanket so you are working along the side.
For this next side PLEASE lay down you work after each section to make sure the project is laying flat. I found that instead of making one hdc in the side of each row I had to make one hdc in the side of every other row. This might be what you have to do as well OR you might be fine making one hdc in the side of each row. Everyone will be different.
You will make one hdc in the side of each row OR one hdc in each st along this side. You will also make one hdc in the joining section between panels if necessary to make your blanket lay flat.
Repeat each corner the same making (hdc, ch 2, hdc) in the last/corner stitch and one hdc in each st or side of each row (unless adjustments are needed for the project to lay flat) all the way around the blanket.
Corner #4: This corner is the most important corner moving forward because it is in this
corner things change a little.
In the last st/corner make (hdc, ch 2) and then slst into the top of the very first
hdc you made to begin this border. This will close Rnd 1.
Rnd 2: ch 1, hdc in each st,
in ch-2 corner (hdc, ch 2, hdc)
Repeat around, periodically laying the blanket down to make sure it is laying flat.
Corner #4: In last ch-2 space (hdc, ch 2, hdc), THEN slst into the top of the first hdc to close
Rnd 2.
Rnd 3: ch 1, hdc in each st,
in ch-2 corner (hdc, ch 2, hdc)
Repeat around, periodically laying the blanket down to make sure it is laying flat.
Corner #4: In last ch-2 space (hdc, ch 2, hdc), THEN hdc in the next st before you slst into
the first hdc to close Rnd 3.
Tie off the Blue color. Attach the White color with a slst in the top corner ch-2 space to attach the yarn to the project.
Rnd 4: ch 1, hdc in the first st, make one hdc in each st,
in ch-2 corner (hdc, ch 2, hdc)
Repeat around, periodically laying the blanket down to make sure it is laying flat.
Corner #4: In last ch-2 space (hdc, ch 2, hdc), THEN slst into the top of the first hdc to close
Rnd 2.
Rnd 5: ch 1, hdc in each st,
in ch-2 corner (hdc, ch 2, hdc)
Repeat around, periodically laying the blanket down to make sure it is laying flat.
Corner #4: In last ch-2 space (hdc, ch 2, hdc), THEN hdc in the next st before you slst into
the first hdc to close Rnd 3.
Tie off the White color. Attach the Red color with a slst in the top corner ch-2 space to attach the yarn to the project.
Rnd 6: ch 1, hdc in the first st, make one hdc in each st,
in ch-2 corner (hdc, ch 2, hdc)
Repeat around, periodically laying the blanket down to make sure it is laying flat.
Corner #4: In last ch-2 space (hdc, ch 2, hdc), THEN slst into the top of the first hdc to close
Rnd 2.
Rnd 7: ch 1, hdc in each st,
in ch-2 corner (hdc, ch 2, hdc)
Repeat around, periodically laying the blanket down to make sure it is laying flat.
Corner #4: In last ch-2 space (hdc, ch 2, hdc), THEN hdc in the next st before you slst into
the first hdc to close Rnd 7.
Tie off your yarn, weave in your ends.
Project Complete!
GREAT JOB!
❤️ Why This Matters
This isn’t just about making a blanket.
It’s about:
Giving someone comfort
Showing appreciation
Using your skills for something bigger
Every stitch becomes part of something meaningful.
📸 Share Your Progress!
I would LOVE to see what you create!
Tag me and use: #CrochetWithTiffany #WarmUpAmerica #VeteransBlanket
💬 Final Thought
If you’ve ever wondered if your crochet could make a difference…
This is your moment.
Let’s create something beautiful—together.

Shipped my blanket off earlier this week. It's not exactly the pattern as I added some panel boarders and extra pattern rows to get the proper size. Also realized as I was folding it up that I put the surged stipe panel on upside down. Doh! I don't think the recipient will know. 😉
It was fun and came together quickly. Thank you Tiffany! What a great campaign!