
🌟 3 EASY Blanket Borders You Can Add to ANY Blanket
- Tiffany

- Dec 22, 2025
- 6 min read
By Tiffany Hansen

DISCLAIMER: *This post may contain affiliate links to support the cost of this blog. At no cost to you, I may make a small commission if you purchase through these links. Read our Privacy Policy HERE
Finishing a blanket feels so good… but sometimes the edges just need a little something extra. Adding a border is one of the easiest ways to give your blanket a clean, polished look—whether you want simple stripes, subtle texture, or a beautiful braided edge.
In today’s tutorial, I’m sharing three beginner-friendly blanket borders you can use with any blanket pattern and any stitch count. Each border builds on the same foundational steps so you never have to stress about math or stitch multiples.
Every border starts with the same foundation round—except Border #2, which uses half double crochets instead of single crochets. Don’t worry, I’ll explain exactly why and how when we get to that section.
Let’s jump in!
⭐ Before You Add a Border: Should You Block Your Blanket?
Blocking is one of those optional steps that can make a huge difference in your final results. If your blanket edges look a little wavy, uneven, or curled, blocking before adding a border can help everything lay much smoother.
What Is Blocking?
Blocking is the process of:
Wetting your project
Pinning it into the shape you want
Letting it air dry completely


Once it's dry, your stitches relax, the fabric opens up, and the edges become straighter and more defined.
Why Block Before Adding a Border?
Because a border sits on top of the edges you have right now. If those edges are curling or uneven, the border may highlight that instead of hiding it.
Blocking can help:
✔️ Straighten edges
✔️ Reduce curling
✔️ Make stitch counts more even
✔️ Help your border lay flat and smooth

When You Can Skip Blocking
You can skip blocking if:
Your blanket already lays flat
The edges look straight
You’re using a yarn that doesn’t respond well to blocking
Blocking isn’t required—but if something looks “off,” it’s a great first step.
⭐ Materials You’ll Need
Using the right materials helps ensure your border blends seamlessly into your blanket.
✔️ Use the Same Yarn Brand and Weight
Even if two yarn labels say “size 4 weight,” they’re not always the same thickness. Sticking with the same brand helps your stitch tension stay consistent.
✔️ Use the Same Crochet Hook You Used for the Blanket
Changing hook sizes can cause the border to flare (if the hook is bigger) or pinch (if the hook is smaller). Using the same size keeps your tension steady.
✔️ Optional: Additional Colors
If you want stripes or accents, grab one or two contrasting colors of the same yarn type.
⭐ Stitch Abbreviations (US Terminology)
These patterns use US crochet terms:
ch – chain
sl st – slip stitch
sc – single crochet
hdc – half double crochet
dc – double crochet
FPdc – front post double crochet
BPdc – back post double crochet
⭐ Foundation Round (Round 1)
This foundation round sets the structure for all three borders.
Note: For Border #2, you’ll substitute hdc everywhere you see sc in this round. The rest is the same.
Round 1 Instructions:
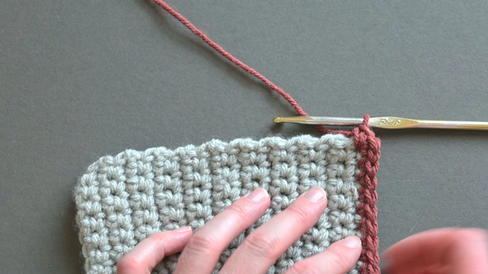
Slip stitch into any upper corner to attach your yarn.
Ch 1.
Work 1 sc in the same stitch.
Single crochet across the top edge, working into each stitch and each chain-1 space.
In each corner, work 3 sc into the same stitch:
1st sc: last stitch for the side
2nd sc: acts as the turning stitch
3rd sc: first stitch for the next side


Working down the side edges:
Place 1 sc into rows ending with sc or hdc
Place 2 sc into rows ending with dc or ch-2
Place 3 sc into rows ending with ch-3 or tr
Along the bottom edge, work between the stitches of Row 1 and match your stitch count to the top edge.

Work up the second side using the same rules.
In the last corner, work 2 sc, then sl st into the first sc to close.

Lay your blanket flat and check for ruffling or bunching before moving on.
🌟 BORDER OPTION #1
Striped Half Double Crochet Border

This border is clean, simple, and perfect for color changes. You can use one color or several—it always comes out beautiful.
Round 2:
Ch 1, hdc in same stitch.
Hdc across.
In corners: make 1 hdc in the first st, 3 hdc in the second st, 1 hdc in the third st
In corner #4, make 1 hdc in the first st, 3 hdc in the second st, then
Sl st to close. Fasten off if changing colors.
Round 3:
Attach new color.
Sl st into the same st you sl st'd into to close Round 2, to attach the yarn to the project.
Ch 1, hdc in same stitch.
Hdc across.
In corners: make 1 hdc in the first st, 3 hdc in the second st, 1 hdc in the third st
Sl st to close. Fasten off if changing colors.
Round 4:
Repeat Round 3. In the final corner, after (hdc, 3 hdc, hdc), add 1 extra hdc before closing.
Round 5:
Repeat Round 4. In the final corner, after your 3 corner hdc, add 2 extra hdc before closing.
Fasten off and weave in ends.
🌟 BORDER OPTION #2
Third Loop Half Double Crochet Border

This border has a gorgeous faux-knit braided texture. It looks advanced but is very beginner-friendly once you know how to find the third loop.
⭐ Special Instructions: How to Crochet Into the 3rd Loop
A half double crochet has three loops:
Front loop
Back loop
Third loop — a horizontal bar behind the stitch


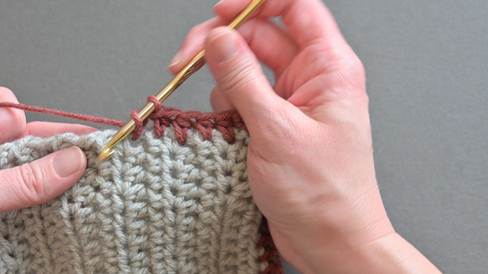
How to Find It:
Tilt your work slightly toward you.
Find the usual V on top of the stitch.
Look directly behind the back loop—there’s a horizontal bar.
Insert your hook under that bar only.
Working into this loop pushes the top V forward, creating that beautiful braided effect.
⭐ Third Loop HDC Border Pattern
Round 1:
Work the Foundation Round, replacing all sc with hdc.
Round 2:
Ch 1, hdc in the 3rd loop in same stitch.
Hdc in the 3rd loop of every stitch.
Corners: make 1 hdc in the 3rd loop in the first st, 3 hdc in the 3rd loop in the second st and 1 hdc in the 3rd loop in the third st.
Sl st to close.

Rounds 3–5:
Repeat Round 2. In Corner #4, add:
Round 3: +1 extra hdc in the 3rd loop
Round 4: +2 extra hdc in the 3rd loop
Round 5: +3 extra hdc in the 3rd loop


Fasten off and weave in ends.
🌟 BORDER OPTION #3
Post Ribbed Stitch Border

This is the most textured of the three borders. If you want something cozy and ribbed, this one is perfect!
Post stitches can look intimidating, but once you get into the rhythm, it’s super satisfying.
⭐ Understanding Corners in Post Stitch Rounds
This is the part beginners get hung up on—but don’t worry, I’ve broken it down clearly.
Each corner has 3 stitches. When you get to them, check what the next stitch in your repeat should be.
✔️ If your next stitch is an FPdc:
Work the corner as:
FPdc
3 BPdc in the center stitch
FPdc Then continue the FPdc/BPdc repeat on the next side.

✔️ If your next stitch is a BPdc:
Work the corner as:
BPdc
3 FPdc in the center stitch
BPdc Then continue the repeat on the next side.

No matter what your stitch counts look like, following this rule keeps your texture consistent.
⭐ Post Ribbed Stitch Border Pattern
Round 1:
Foundation Round.
Round 2:
Ch 2 (does not count).
Dc across in each st.
Corners: dc in the first st, 3 dc in the second st, dc in the third st.
Sl st to close.
Round 3:
Ch 2 (does NOT count as a stitch)
Alternate FPdc, BPdc.
Work corners using the rules above.
Sl st to first FPdc to close.
Round 4:
Ch 2 (does NOT count as a stitch)
Work opposite post stitch on top of previous row.
FPdc on top of BPdc's and BPdc on top of FPdc's
In Corner #4, add 1 extra post stitch before closing.
Round 5:
Repeat Round 4, but Corner #4 gets 2 extra post stitches before closing.
Fasten off and weave in ends.
⭐ Video Tutorials
Here’s the full step-by-step so you can follow along visually:
▶️ Right-Handed Tutorial
▶️ Left-Handed Tutorial
⭐ Printable Patterns
If you’d like a clean, easy-to-print copy of each border pattern, download them below:
⭐ Join The Crochet Club!
If you love learning new stitches, connecting with other crocheters, joining group hangouts, and having access to exclusive patterns and workshops, you will love being part of the Crochet Club Membership.

Inside you’ll get:
✔️ Weekly live meetups
✔️ Workshops + technique deep dives
✔️ Exclusive patterns
✔️ Community challenges
✔️ Support, inspiration, and new friends
✔️ A FREE trial if you're brand new!
👉 Join here:
I would love to have you in the community!
⭐ Closing Thoughts
I hope these three easy blanket borders inspire you to give your next project a beautiful finishing touch. Whether you choose clean stripes, a braided edge, or textured ribs, adding a border is such a fun way to bring a blanket to life.
Thank you so much for being here with me today.
Happy crocheting — and I hope you have the BEST day! 💛


Comments