
Prism Hexagon Wrap Crochet Pattern
- Tiffany

- Mar 13
- 9 min read

DISCLAIMER: *This post may contain affiliate links to support the cost of this blog. At no cost to you, I may make a small commission if you purchase through these links. Read our Privacy Policy HERE
There’s something magical about taking simple shapes and turning them into a beautiful wearable. The Prism Hexagon Wrap does exactly that. This cozy wrap is constructed using a combination of full hexagons and half hexagons, creating a stunning geometric design that looks intricate but is surprisingly approachable once you understand the construction.
What makes this project extra special is the thoughtful design details. The wrap features functional pockets, a structured collar, and a visually striking hexagon layout that creates a flattering drape when worn. It’s the kind of project that feels exciting to crochet and incredibly satisfying to wear.

If you enjoy learning new crochet techniques while creating something practical and beautiful, this project is a fantastic one to dive into.
Video Tutorials
Follow along with the step-by-step video tutorials to see every part of this wrap come together.
Right-Handed Tutorial
Left-Handed Tutorial
These tutorials walk you through the entire process, including:
• Crocheting the full hexagon motif
• Crocheting the half hexagon motif
• How the pieces are laid out and joined together
• How to create the pockets
• How to crochet and attach the collar
Why You’ll Love This Project

The Prism Hexagon Wrap is a wonderful project for crocheters who enjoy learning new techniques while still working with familiar stitches.
Here are a few reasons this project is so rewarding:
Learn Hexagon Construction
Hexagons are one of the most versatile shapes in crochet. Once you understand how they work, you can apply the concept to blankets, garments, and accessories.
Create a Wearable Statement Piece
The geometric design creates a modern look that stands out while still being cozy and practical.
Practice Joining Techniques
Joining motifs is an important crochet skill, and this project provides a great opportunity to practice creating clean seams.
Functional Design Features
The pockets and collar make this wrap both stylish and practical.
Relaxing Crochet Project
Working motif by motif makes this project easy to pick up and work on whenever you have time.
Printable PDF Pattern
Prefer a clean, ad-free version of this pattern? ✉️

You can purchase the printable PDF version which includes:
• Easy-to-print formatting
• Step-by-step instructions
• A layout diagram
• Helpful crochet tips
Pattern Information
Skill Level - Advanced Beginner
Terminology - US Crochet Terminology
Finished Dimensions - Approximately 24 inches wide x 70 inches long
Materials
Yarn Premier Yarns Anti-Pilling Select
Main Color: Pistachio (Color A)
Joining / Border / Collar Color: Crème (Color B)
Amount: Pistachio - 1,260 yards
Creme - 90 yards
Additional Supplies:
• Scissors
DISCLAIMER: Links included in this description might be affiliate links. If you purchase a product or service with the links that I provide I may receive a small commission. There is no additional charge to you! Thank you for supporting my channel so I can continue to provide you with free content each week!
Abbreviations
ch – chain
dc – double crochet
sc – single crochet
sl st – slip stitch
sts – stitches
BLO – back loop only
sc2tog – single crochet two together
Rnd - Round, like Row but in a circle
Prism Hexagon Wrap Pattern
Full Hexagon (Make 6)
Work in rounds, turning at the end of each round to maintain straight lines.
Using Color A
Rnd 1:
Begin with a magic ring.
Ch 3 (counts as first dc).
Work 11 dc into the ring.
Join with sl st in the top of the first ch 3.
(Total: 12 dc)

Rnd 2:
Ch 4 and turn. Counts as your first dc.
Dc in same stitch you just sl st'd into to close Rnd 1. This creates the first corner.
Dc in next stitch.
Repeat *(dc, ch 2, dc) in next stitch, dc in next stitch around to create six corners.
Join with sl st in the 2nd ch of beginning ch 4.
(Total: 18 dc, 6 ch-2 corner spaces)

Rnd 3:
Ch 3, turn, (counts as your first dc),
make one dc on top of each dc,
in each ch-2 corner make a (dc, ch 2, dc).
Repeat * dc on top of each dc, in each ch-2
corner (dc, ch 2, dc).
(Total 30 dc, 6 ch-2 corner spaces)
End round with a sl st in the top ch of beginning ch 3.

Rnd 4 thru Rnd 12: Repeat Rnd 3
Tie off your project. Cut a 5-6 inch long tail. Weave in your ends.
Half Hexagon (Make 9)
Using Color A
Row 1:
Begin with a magic ring.
Ch 3 (counts as first dc).
Work 6 dc into the ring.
(Total 7 dc)
Row 2:
Ch 3, turn (counts as your first dc)
*(dc, ch 2, dc) in next stitch,
dc in next stitch, (dc, ch 2, dc) in next stitch,
dc in next stitch, (dc, ch 2, dc) in next stitch,
dc in the last st.
(Total 10 dc, 3 x ch-2 corner spaces)
Row 3:
Ch 3, turn (counts as your first dc)
Dc in first 2 sts, (dc, ch 2, dc) in ch-2 space.
Dc in each dc across, working (dc, ch 2, dc) in each ch-2 corner space.
(Total 16 dc, 3 x ch-2 corner spaces)
Rows 4–12
Repeat Row 3.
Each row increases by 6 stitches.
Row 4 - Total 22 dc
Row 5 - Total 28 dc
Row 6 - Total 34 dc
Row 7 - Total 40 dc
Row 8 - Total 46 dc
Assembly

Lay out the motifs so the six full hexagons run down the center of the wrap.
The half hexagons line the outer edges, creating straight sides.
Using Color B
Join hexagons using slip stitch through the back loop only for a clean seam.


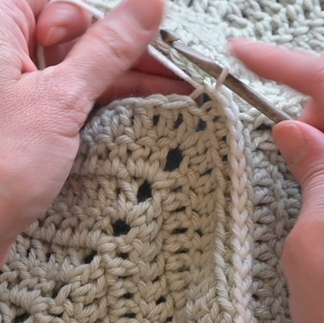


Begin by placing 2 half hexagons next to each other. Taking your Creme color yarn, create a slip knot and insert your crochet hook into the BLO of the first st on hexagon #1, then place your crochet hook into the BLO of the first st on hexagon #2. Yarn over and pull the yarn through all loops including the one on your crochet hook for a full sl st.
Repeat inserting your crochet hook into the BLO of the next stitch on hexagon #1, then the BLO of the next stitch on hexagon #2. Yarn over and pull the yarn through all loops for a sl st.
Once you get to where the 3 corner spaces connect, look for the 2 chains of each corner.
Insert your crochet hook into the BLO of the next open chain on hexagon #1, then the BLO of the next open chain on hexagon #2. Yarn over and pull through all loops.
GREAT!
Now we will join one full hexagon to the next side of hexagon #2.
Insert your crochet hook into the BLO of the next chain of the new hexagon, then insert your crochet hook into the BLO of the next chain of hexagon #2. Yarn over and pull through all loops.
Continue joining sides together.
Once you've joined the last 2 stitches together, cut your yarn leaving a 5 to 6 inch long tail, tie off your work.
To join the sides left behind the original join, start with a slip knot.
Insert your crochet hook into the BLO of the next open corner chain of one hexagon, then insert your crochet hook into the BLO of the next open corner chain of the hexagon right next to the first. Yarn over and pull the yarn through all loops on hook.
Then continue the join as you have to join all the hexagons together.


Creating the Pockets


The outer bottom hexagons become pockets.
Fold each hexagon in half and join the sides using the same joining method, leaving the top edge open.
Fold the last hexagon in half so that the right side of the stitches are facing outward.
The right side is the side where you can clearly see the V-shaped stitches from the last round.
Start by inserting your crochet hook into the ch-2 corner of the folded hexagon, then insert your crochet hook into the ch-2 corner of the half hexagon. Yarn over and pull through all loops.
Insert your crochet hook into the BLO of the next st, insert your crochet hook into the BLO of the folded-side stitch closest to you. This will close the pocket.
Then, insert your crochet hook into the BLO of the next st on the half hexagon. Yarn over and pull through all the loops for a sl st.
And repeat to the first corner.
When you get to the corner, insert your crochet hook under the BLO of the first ch of the front and back of the folded hexagon AND the BLO of the first chain of the half hexagon. Yarn over, pull through for a sl st.
Then open the folded hexagon and only join the back of the hexagon to the next full hexagon. This will keep the pocket open.
When you get to the next corner ch 2 space, only join the back of the folded hexagon with the other hexagon for the first chain in the BLO. Bring back the front side of the folded hexagon and insert your crochet hook into the BLO of the second ch of the front, back, and next chain of the other half hexagon to join AND close the pocket on this side. Repeat the join all the way to the end.
Make your last joining st in the ch 2 corner space of both hexagons, then cut your yarn and tie off your work leaving a long enough tail to weave in your ends.
Repeat on the other side for pocket #2.

Border


With Color B, sl st into the ch-2 corner next to the pocket.
Ch 1, sc into the same corner space.
Make one sc in every stitch to the corner.
In the last st/corner st you will make a (sc, ch 2, sc),
Rotate your work so you can start working along the next side of the project.
Make one more sc in the side of that row next to the corner. You will make 2 sc in the side
of each dc row.
Make one sc in the middle (magic ring) space of the half hexagon.
When you reach a join, make one sc around the first open ch, sk over the join, sc around the open ch on the other side of the join. Continue on.
In the collar section, make the pointed corner with the same (sc, ch 2, sc) then rotate.
In the valley sections, look for the open chains and make a sc2tog. This will round out the corner.
Continue all the way around to the next pocket. End the border with 1 sc in the ch-2 corner space next to the pocket.
Collar
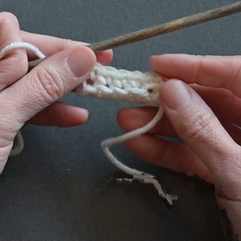
Working with Color B or the Creme Color.
Ch 6
Row 1:
Sc in second ch from hook and in each ch across. (Total 5 sc).
Row 2:
Ch 1, turn. Sc in BLO of each st across.
Rows 3–66:
Repeat Row 2.


Take 2 stitch markers. Looking at the collar section of the wrap, place a stitch marker in the 5th st from the corner edge. Don’t forget to count the corner chain as a stitch.

Attach the two edges of the corner of the collar with the stitch markers. Make sure the collar is not twisted.

With a yarn needle, whipstitch the collar to the wrap.

Join the side of the collar with the last 4 stitches remaining in this collar section, then whipstitch together.
Cut your yarn, tie off and weave in your end. Repeat on the other side.


Last thing you have to do is weave in all your ends and your project is complete!
Great Job!
Join the Crochet Club

Looking for more crochet inspiration and community?
Inside the Crochet Club, you’ll find:
• Exclusive crochet patterns
• Crochet Alongs
• Live crochet sessions
• Workshops and tutorials
• A wonderful community of crocheters
👉 Learn More About the Crochet Club Here ▶ BECOME A MEMBER | Crochet with Tiffany
Share Your Project
I absolutely love seeing what you create!
If you make the Prism Hexagon Wrap, please share your project on social media and tag me so I can see it. 📷
Instagram & Facebook @crochetwithtiffany
Your creations inspire the entire crochet community!
More Projects You Might Enjoy
If you enjoyed this project, you might also love:
• Hugs & Kisses Shawl ▶ https://youtu.be/qxM7Xc5sDHo
• Monet Shawl ▶ https://youtu.be/qY68odc3aWE
• Cara Shawl ▶ https://youtu.be/V-nlzW7l9o8
Final Thoughts
The Prism Hexagon Wrap is a wonderful reminder that crochet can turn simple shapes into something truly special. With its geometric design, cozy pockets, and beautiful collar, this wrap is both a fun project to crochet and a piece you’ll love wearing.
Take your time, enjoy each motif as you work through the project, and most importantly—have fun creating something handmade.
Happy crocheting! 🧶


Comments